")
Μαθήματαπαρατηρητικότηταςπειραμάτωνσυμπερασμάτωνστα Αγγλικά!
Explanation of our Experiment!
"Tell me and I forget. Teach me and I may remember. Involve me and I learn. B.Franklin''
Φέτος αποφασίσαμε να γίνουμε CSI detectives!
Ένα έγκλημα θα λάβει χώρα κάποια στιγμή στο θεατράκι του φροντιστηρίου μας και οι δαιμόνιοι CSI agents των Cs, Ds, B2-Lower and C2-Proficiency τάξεων θα κληθούν να το λύσουν.
Αστυνομικό Μέγαρο:
Το εναρκτήριο λάκτισμα αυτού του project έγινε σήμερα όταν φιλοξενηθήκαμε απο την Υποδιεύθυνση Forensic Science (Εγκληματολογικών Ερευνών) Β. Ελλάδος στο Αστυνομικό Μέγαρο Θεσσαλονίκης.
Εκεί επισκεφτήκαμε τα εργαστήρια ψηφιακού εγκλήματος, γραφολογίας και πλαστογραφίας, πυροβόλων και όπλων αλλά και το χημείο. Μας εξήγησαν πως δουλεύει το κάθε τμήμα με τα πειστήρια και πως πρέπει αμερόληπτα να τα εξετάζει ώστε να καταλήγει σε πορίσματα. Μας μίλησαν για το τι πρέπει να γνωρίζει ο κάθε agent ώστε να συλλέγει τις κατάλληλες πληροφορίες και πειστήρια για να μπορέσει με τα συμπεράσματα του να συντελέσει στην επίλυση των διαφόρων εγκλημάτων.
Έπρεπε να μπορούσατε να ακούσετε τις ερωτήσεις των παιδιών μας...
Εννοείται οτι δεν έχουμε φωτογραφικό υλικό απο μέσα απο τα εργαστήρια για ευνόητους λόγους...
CSI - Solve a crime
Day 1: Breaking down the crime scene
Students entering the school could hear the sound of a siren. Having taken the FBI special agents ID cards, puzzled they walked in class. I was waiting for them to present the new crime related vocabulary, and narrate the story. After explaining the techniques a CSI uses for the collection of evidence, the difference between evidence and inference and the need for accuracy and detail, we discussed the plot. There was a victim and 4 suspects....then we moved on to the crime scene, where now in teams they had to work on their observation and note keeping skills, sketching of the crime, and collection of evidence without disturbing the scene. We talked about orientation, measuring techniques, and some chemistry.
All samples were sent to the "lab" for forensic analysis. This will be our Day 2 in the life of a CSI....
Day 2: Lab Work
This week was very busy with our brainy special agents trying their luck testing their evidence in the lab.
Objectives:
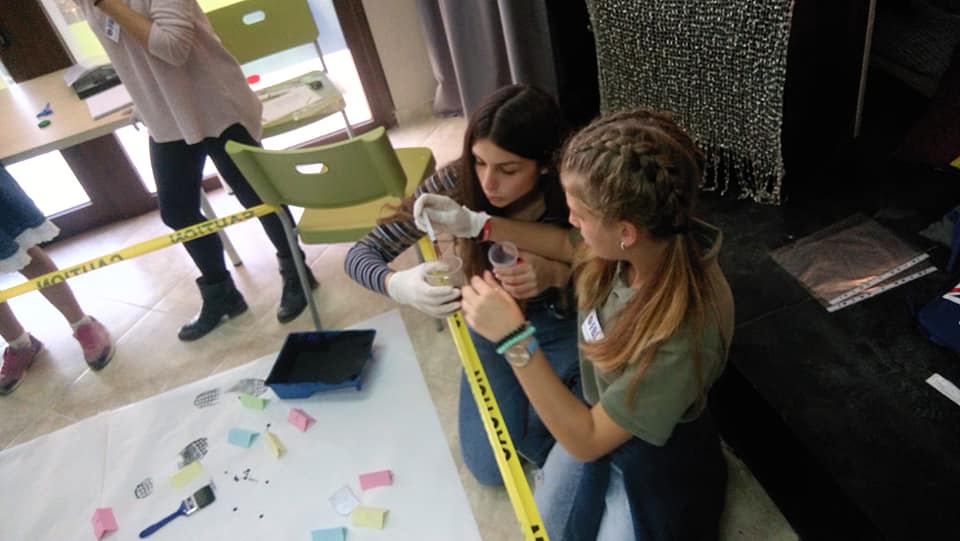
#STEM The students learnt what acids and bases are, their properties, the pH scale and its usefulness in our every day life. After the small pH-colour-change demo, their target was to determine if the sample they had previously collected from our victim's drink had been spiked. They also tested three possible "poisons" to finally conclude the one that had been used by the culprit.
***For the purposes of the lesson, all items that were used were household items***
pH demonstration: So, each team was given pairs of gloves, a set of jars filled with different solutions I got from the supermarket, a set of plastic glasses and pipettes. We used red cabbage juice as our indicator, in order to observe the colour change of the different solutions.
The kids were so surprised and awed by the results that they kept asking questions and expressing their excitement in English.
Spiked drink: We added some drops of cabbage juice indicator in the samples they had collected from the crime scene and saw the drink changing colour. When they cross-checked if the same would happen with the normal Coke they noticed that it didn't. Conclusion?
Someone had INDEED spiked the drink. But how could he since the agents had also found a recently opened can next to it? It was time to test the ice cube tray samples.
Ice cube Tray: We added some drops of cabbage juice indicator in the water samples from the ice cube tray. The agents expected the colour of it to be purple like the colour they got when they tested the water. However the result was a greenish colour leading them to the conclusion that the ice was the way the victim was poisoned.
Which poison was it?
Of course, NO real poison was used in the whole plan, so when they started checking the powder, we named "Wheat Flour" as poison A, "baking soda" as poison B, and "Corn Starch" as poison C. Then they added Iodine drops to all these three plus their mystery powder, and they repeated the process by adding vinegar to the second row of the same samples.
Conclusion: the starchy poisons turned black when they were dyed with iodine, and got wet when dyed with vinegar. On the other hand, the baking soda poison and the mystery powder turned into orange brown when iodine was added to them, and started fizzing when vinegar came into contact with them. Result??? It was poison B.
...... In the 3rd part of our Lab we will check the rest of our evidence...
Finally our school sends our gratitude and appreciation to Φαρμακείο Κ. Μπέκας, and Κώστας Αλεξιάδης for supplying us with syringes, tubes and measuring tapes for free in order our students to collect their samples.

STEM
Ηow to solve a CRIME
Χημεία:Ανάλυση pΗ - Οξέα και Βάσεις
Έκθεση: Συγγραφή Άρθρου Εφημερίδας
Τελικά ποιος το έκανε;